Kilt Measuring Guide
How to Take Your Measurements for a Made-to-Measure Kilt
To make a kilt, the kiltmaker needs three basic measurements: waist, hips and kilt length.
The other details are used to check that the measurements have been entered correctly. Please measure yourself for your kilt as follows:
- Ask someone to help you take your measurements. If you measure yourself, some measurements (especially the kilt length) will be inaccurate.
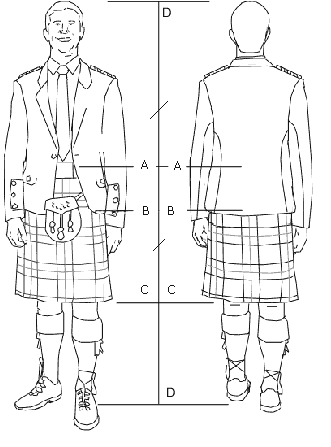
- Waist (A): this is the waist at navel height, i.e. your natural waist – not where trousers are worn nowadays. Measure snugly, so that 1–2 fingers fit under the tape.
- Hips (B): this is the widest point around the seat
- Kilt length (C): this is where a helper is really important. Stand up straight with your feet together, looking straight ahead. Your helper should mark the navel level at the hip bone and, from there, run the tape down the thigh to the top of the knee – where the kneecap ends.
- Wearer’s height (D): this is mainly a check that none of the measurements is wildly out.
- Wearer’s weight (E): as with D, this is only used as a check.
If anything in this measuring guide is unclear, please send your question to david@kiltforyou.eu and we will be happy to help. It is better to ask beforehand – a finished kilt is very difficult to alter, and a quality kilt is something you keep for life. It would be a shame to have it made badly because of incorrectly taken measurements.